I HAVE MOVED! FIND ME HERE :)
Thursday, July 3, 2014

Thursday, June 12, 2014
Card Making Galore!
I was lucky enough to take a Lawn Fawn specific card making class with Jenn from Shurkus.com on Saturday at a local scrapbook store and afterward I was incredibly inspired! I learned some new techniques that I am psyched to try out soon, mostly copics. I finally got to play around with them and I'm in love! They are so easy to use but boy oh boy they are expensive. That is going to be an investment that I'm going to have to talk my husband into letting me purchase. For now I will settle for my prisma colored pencils and gamesol.
So after class I did a wee bit of shopping from some old and new Lawn Fawn products. The older things I picked up were the Let's Polka 6x6 paper pad, Stitched Journaling Card die set, and Speech Bubble Border die. From the new release I picked up the Beep Boop Birthday stamp set and matching lawn cuts. I am pretty sure I'm going back to get Chit Chat stamp set and matching lawn cuts, I was eyeing it and totally regret not purchasing it! And of course onto the cards I put together using my new goodies...
 Supplies:
 Supplies:

Supplies:
So after class I did a wee bit of shopping from some old and new Lawn Fawn products. The older things I picked up were the Let's Polka 6x6 paper pad, Stitched Journaling Card die set, and Speech Bubble Border die. From the new release I picked up the Beep Boop Birthday stamp set and matching lawn cuts. I am pretty sure I'm going back to get Chit Chat stamp set and matching lawn cuts, I was eyeing it and totally regret not purchasing it! And of course onto the cards I put together using my new goodies...
- Beep Boop Birthday Stamp Set and Die Cuts (Lawn Fawn)
- Let's Polka 6x6 Paper Pad (Lawn Fawn)
- Prisma Colored Pencils & Gamesol
- Speech Bubble Die (Lawn Fawn)
- Stitched Journaling Card Die (Lawn Fawn)
- Beep Boop Birthday Stamp Set and Die Cuts (Lawn Fawn)
- Let's Polka 6x6 Paper Pad (Lawn Fawn)
- Prisma Colored Pencils & Gamesol
- Simon Says Stamp Love This Clear Stamps (SSS)
- Stitched Journaling Card Die (Lawn Fawn)
- Twine in Tangerine (Doodlebug)
I also used some non new goodies to work up one out of 3 Father's Day cards I needed to make. I'm terrible at masculine cards! They are always so difficult since I am in love with all things pinky and girly but I think I did alright for my first try. It's always fun to break out old products and use them in new ways. This was also my first time embossing an image on watercolor paper and then using distress inks on top to do a watercolor resist effect, this is probably my favorite technique so far and I really love the look of it, perfect for a manly card using darker colors!
- Chevron Background Stamp (Hero Arts)
- Enamel Dots (My Mind's Eye)
- Distress Ink in Peacock Feathers (Tim Holtz)
- Simon Says Stamp Love This Clear Stamps (SSS)
- Watercolor Paper (Ranger)
- White Embossing and Gold Embossing Powder (Stampendous)
Saturday, June 7, 2014
Hershey Kiss Stickers
While planning a baby shower I thought it would be cute to do the Hershey Kiss stickers you see all over pinterest/etsy as part of the table decorations. You will need to create 3/4" diameter stickers for these. I believe Avery makes labels in a size that will work but I used my Silhouette Cameo and regular sticker paper to do this project. It was super simple to create images in the Silhouette program using the same graphics I used on the rest of the baby shower projects I did. I got 40 stickers per sheet. I might have been able to get more done but my printer is extremely fussy and if I take up too much of the print and cut area it will completely cut off my project during printing! I was too afraid of wasting ink and sticker paper to see just how many I could get out of there.
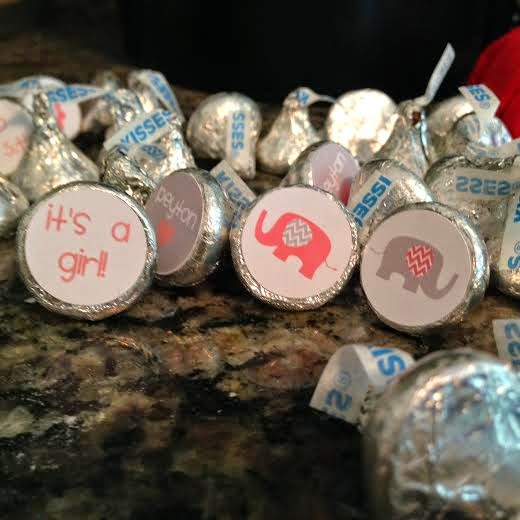
I am going to try and do a video tutorial soon on these since they were so cute and such a hit I'm going to make them for Landon's 5th birthday. Yes, I am THAT mother that is already planning her child's birthday when he still has 7 months until then...
I am going to try and do a video tutorial soon on these since they were so cute and such a hit I'm going to make them for Landon's 5th birthday. Yes, I am THAT mother that is already planning her child's birthday when he still has 7 months until then...
Simon Says Stamp June Card Kit 2014
I really adored this month's card kit, believe or not I think this is my first flower stamp set! I just adore the two tone effect you can get with the flowers but it did make me realize I really need more ink pads and colors! I ordered a Simon Says Stamp Lavender stamp pad last month to test out and I am digging it, I think I might order some more colors. I'm also excited to try out the resist embossing and water color technique I've been seeing all over Youtube lately with these flowers.

- My Mind's Eye Enamel Dots (SSS June Card Kit)
- SSS Favorite Flowers Stamp Set (SSS June Card Kit)
- SSS Watt's Up Stamp Set (SSS)
- SSS Slate Cardstock (SSS June Card Kit)
- White, Purple, and Pink Cardstock (Michael's Craft Stores)
- Stampendous White Embossing Powder and Versamark
- Hero Arts Ink: Soft Pool, Soft Vanilla, Pale Tomato, Field Greens, Soft Cantaloupe, Pool, Soft Olive, Red Royal
- Heidi Swapp Ink: Navy Blue
- SSS Ink: Lavender
Friday, April 18, 2014
Easter Basket - Sand Pail
For my son's Easter basket this year I went with something I saw on Pinterest - buckets with the child's name in vinyl. I picked a sand pail with shovel instead because we go to the lake a ton in the summer and my son was very much in need of a new pail. I think next year I'll go with a regular bucket so I can reuse it every year. Or maybe I'll just keep doing new sand pails! The best part of this project was it was my very first one in our brand new home and my awesome new craft room.

I cut the vinyl on my Silhouette cameo and just used their stock settings and brand of vinyl. I don't have any issues with their vinyl but I always have a ton of issues with their transfer paper. If anyone has a recommendation for a better transfer paper please let me know. The font I used was Impact, I wanted a nice bold font that would stand out.

We are trying to go more simple in life so his basket has goodies that he'll actually use, didn't cost a ton, and isn't 100% candy.
He is getting:
Planes Play Pack $1
Bubbles $1
Pinwheel $1.50
Shovel and Pail $1
Lego Kit $10
Pez dispenser $3
Total - $17.50
Not bad considering he (and me) love Legos right now and that was more than half the cost!
I cut the vinyl on my Silhouette cameo and just used their stock settings and brand of vinyl. I don't have any issues with their vinyl but I always have a ton of issues with their transfer paper. If anyone has a recommendation for a better transfer paper please let me know. The font I used was Impact, I wanted a nice bold font that would stand out.
We are trying to go more simple in life so his basket has goodies that he'll actually use, didn't cost a ton, and isn't 100% candy.
He is getting:
Planes Play Pack $1
Bubbles $1
Pinwheel $1.50
Shovel and Pail $1
Lego Kit $10
Pez dispenser $3
Total - $17.50
Not bad considering he (and me) love Legos right now and that was more than half the cost!
Saturday, March 22, 2014
Happy Spring!
I wish I could say Spring is here for real but sadly today is 54 degrees and in just 2 days were supposed to get more snow. I can't even remember the last time we had snow so late in March and I'm not really happy about it. I cannot wait for when our days are consistently warmer not just here here and there.
But yesterday we got some great news! Our mortgage commitment paperwork came through! So now we set our closing date and wait. In my previous post I mentioned closing on April 1st and it still looks like that is going to happen thankfully. I am beyond thrilled. And also scared as all hell, I mean a house is a huge step. I still don't feel "grown up" enough to own a house. We were also going to paint/do some work before we moved in but we just hate our current location/apartment so much we said screw that we're moving right in so now I'm even more excited.
As for crafting I'm trying to get some cards made before we move because I don't think I'll have much time to do any the first month or so. I also have a banner order to make. Tonight after Landon goes to bed my goals are to sketch out the banner and make 2 cards. I also made a few cards last weekend I need to file away in my card box, I want to do a post on my card box but it's from a kit literally 10 years ago and not available anymore so I feel I need to find something new or at least similar to it first. Ahhh my to do list seems a mile long all the time! Does anyone else feel that way?
Hope you all are enjoying warmer weather! :)
But yesterday we got some great news! Our mortgage commitment paperwork came through! So now we set our closing date and wait. In my previous post I mentioned closing on April 1st and it still looks like that is going to happen thankfully. I am beyond thrilled. And also scared as all hell, I mean a house is a huge step. I still don't feel "grown up" enough to own a house. We were also going to paint/do some work before we moved in but we just hate our current location/apartment so much we said screw that we're moving right in so now I'm even more excited.
As for crafting I'm trying to get some cards made before we move because I don't think I'll have much time to do any the first month or so. I also have a banner order to make. Tonight after Landon goes to bed my goals are to sketch out the banner and make 2 cards. I also made a few cards last weekend I need to file away in my card box, I want to do a post on my card box but it's from a kit literally 10 years ago and not available anymore so I feel I need to find something new or at least similar to it first. Ahhh my to do list seems a mile long all the time! Does anyone else feel that way?
Hope you all are enjoying warmer weather! :)
Friday, March 14, 2014
Growing Up
Most girls I know dreamed of their wedding, the perfect house, kids, etc. And I certainly dreamed of those things but of course life doesn't always go the way you want them to or things get out of order. For instance my husband and I knew we wanted to get married before we were pregnant but we started trying to conceive a baby and apparently the universe decided to have a baby before wedding. Every book told me conceiving takes 6-12 months which for us it only took 1. We didn't have the big wedding, yet, we plan to, just haven't gotten around to it. We decided to just go ahead and do the whole courthouse thing and by gosh it's sad to say but our 4 year marriage has outlasted some pretty lavish and expensive weddings. The venue doesn't equal a great marriage.
As far as children go I like to think my son is pretty perfect, just like every mother thinks of her own child. And yes we did want more children. That didn't seem to be in our plans either. I guess just because the first one is easy the second isn't. And that's ok too. We have a great marriage, and a pretty awesome kid. Life is good. But we didn't have a house.
But now we do. Or we will. Our tentative closing date on our "dream" house is April 1st. I haven't packed a single thing, I'm already freaking out about our mortgage payment, and I'm a pinterest addict trying to plan room colors. But man oh man, it will be OUR home. We can decorate and paint and do whatever we want with it. I'll have my very own craft room, a master bathroom off our bedroom. It's wonderful. The location is amazing. It has everything I wanted in a home. Of course it's not perfect, one of the bathroom will need renovations but again, it is OURS.
And I can't wait to share my renovation/decorating journey on this blog once we move in next month!
As far as children go I like to think my son is pretty perfect, just like every mother thinks of her own child. And yes we did want more children. That didn't seem to be in our plans either. I guess just because the first one is easy the second isn't. And that's ok too. We have a great marriage, and a pretty awesome kid. Life is good. But we didn't have a house.
But now we do. Or we will. Our tentative closing date on our "dream" house is April 1st. I haven't packed a single thing, I'm already freaking out about our mortgage payment, and I'm a pinterest addict trying to plan room colors. But man oh man, it will be OUR home. We can decorate and paint and do whatever we want with it. I'll have my very own craft room, a master bathroom off our bedroom. It's wonderful. The location is amazing. It has everything I wanted in a home. Of course it's not perfect, one of the bathroom will need renovations but again, it is OURS.
And I can't wait to share my renovation/decorating journey on this blog once we move in next month!
Thursday, March 6, 2014
St Patrick's Day Birthday Banner
For this St Patrick's themed birthday banner I actually used the Echo Park St Patrick's Day mini kit! The dark green and lighter green papers are from michael's but the patterned paper I printed out from the digital version of the Echo Park kit and the shamrocks/clovers were from the Silhouette Cameo store. I had fun with this one!
.JPG)
Minnie Mouse Birthday Card
I am going to put up a tutorial soon on this but wanted to get it posted.
.JPG)
Disney Planes - Landon's 4th Birthday
My son's request this year was a Planes themed party. Since I went the route of a play place for his party I only had to make a few things: his invitations, birthday banner, and goody bag thank you tags. I originally planned to make a shirt as well but ran out of time. Darn procrastination.
I can say for the invitations I took a design I found on pinterest and copied it completely so I am not going to post mine. There are some very wonderful Planes birthday invitations out there on pinterest and etsy right now!

For the banner I did orange, blue, and white which seem to be Dusty Crophopper "theme" colors in the movie. I traced Dusty and used print and cut on the Silhouette cameo as well as editing the Planes logo to say Landon instead. I was very pleased with the results and it took me no more than an hour to put together the night before the party. I know, I told you, procrastination!

The only print and cut item I did was the thank you tags for the goody bags. I got a 10 pack of bags from Target for about $4-5 and then glued the tag on the front of it. I really liked how these came out and they were super easy to do!
Normally I make cupcake toppers but my son requested a Dusty cake which I knew I couldn't pull off so I had the grocery store make that. I also did snack foods: chips, dips, pretzels, cheese, crackers, and juice boxes. It was a quick, laid back party this year. Maybe next year I'll go bigger!
I can say for the invitations I took a design I found on pinterest and copied it completely so I am not going to post mine. There are some very wonderful Planes birthday invitations out there on pinterest and etsy right now!
For the banner I did orange, blue, and white which seem to be Dusty Crophopper "theme" colors in the movie. I traced Dusty and used print and cut on the Silhouette cameo as well as editing the Planes logo to say Landon instead. I was very pleased with the results and it took me no more than an hour to put together the night before the party. I know, I told you, procrastination!
The only print and cut item I did was the thank you tags for the goody bags. I got a 10 pack of bags from Target for about $4-5 and then glued the tag on the front of it. I really liked how these came out and they were super easy to do!
Normally I make cupcake toppers but my son requested a Dusty cake which I knew I couldn't pull off so I had the grocery store make that. I also did snack foods: chips, dips, pretzels, cheese, crackers, and juice boxes. It was a quick, laid back party this year. Maybe next year I'll go bigger!
Sunday, January 12, 2014
Valentine's Day Cards
My sister and I got together this week to do some card making. I made 4 cards total but 2 I ended up being not too fond of. I need to work on my embossing a bit more, I have to get in the habit of using a powder bag before stamping. These are the 2 I really liked:
.JPG)
.JPG) |
| Love stamp was from Simon Says Stamp clear stamps in "Love This" (I masked off the this part to make it just love). Paper and ticket was from the Simon Says Stamp January card kit, large heart I cut from my Silhouette Cameo, and the twine is Doodlebug! |
.JPG) |
| XOXO was cut from my Silhouette Cameo, washi tape is Queen B red/white chevron, and stamps were from Simon Says Stamp clear stamps in Only Have Eyes For You. |
I also took an idea from my sister and started hanging up my current cards/photos above my craft desk! Put my Red Sox ribbon to good use finally! :)
Monday, December 30, 2013
2014 Resolutions
Last year I didn't make too many resolutions mostly because I've never been good at sticking to them. But I did want to lose weight and save money for a house. Well I dropped 35-40 lbs total in 2013 AND we have a deposit on a house right now so I'm pretty motivated to make some better resolutions this year and stick with them.
2014 Resolutions
2014 Resolutions
- Make all my cards - I don't want to spend money on store bought ones next year, I have more than enough supplies to accomplish this, especially with my monthly Simon Says Stamp card kit!
- Tone up enough to wear a bikini - Not sure if this will happen. I'm pretty self conscious of my belly post child still.
- Minimal soda - I really cut down on soda in 2013 and it helped me lose a lot of weight. I'd like to cut even more out next year, maybe to none at all!
- Cut the negativity out - I have people who are so negative in my life and just bring me down. Saying goodbye to those in 2014.
- Save money and set a new budget - I don't know who doesn't have this on their list.
- To Do Lists - I found them super helpful the past couple months and I'd like to continue to use them through the whole year to keep better organized with things that need to be done!
- Keep up with project life - I want to do August to August so I'd like to 100% complete one next year and start the second!
Saturday, December 28, 2013
Winter Wonderland/Onederland Birthday Party
I was asked to make a banner plus a few extras for a little girls first birthday! Since everyone I know pretty much has boys I was psyched to get to do something girly. The request was winter wonderland/onederland themed and mostly blue/white with a touch of pink and glitter.

Food tags! 4"x2" when folded and left blank for her to write anything she wants on them. I also included a few extras she can use for other things or in case she messes up on a tag.

Favor tags! 2.5" diameter, I left enough ribbon for her to tie on or she can tape it on and the hanging ribbon will still look cute.

The banner! This banner was probably the most work yet only because I didn't like the way the original colors were. I started just white, light blue, and pink but it looked like a baby shower. I added in the dark blue and dark pink but I thought it was too much pink. Finally I settled on dark blue, light blue, white, and a few sprinklings of pink. The snowflakes were cut out of Doodlebug's lily white sugar coated cardstock and is very sparkly, the penguin was a silhouette cut file from their store. Each square is 4.25"x4.25" so it's pretty large!
Friday, December 27, 2013
January 2014 Simon Says Stamp Card Kit - Valentines Days Card

Materials:
- Silhouette Cameo to cut shapes (flag shape designed by me, sentiment shape from silhouette store)
- Simon Says Stamp stamp set in Only Have Eyes For You
- Mini Heart Brads (source unknown)
- Cuttlebug Embossing Folder in Birds and Swirls
- Paper from Fancy Pants Beloved collection
- Bazzil Cotton Candy cardstock for base, Bazzil Marshmallow cardstock for sentiment shape and background
Adhesives:
- Tombo Perm Adhesive Tape Runner
- Pop dots for sentiment
5 Year Old Birthday Card
Landon got his very first preschool birthday party invite (eek!) and I decided to go ahead and make a card for the birthday girl since her mom said she was super girly and I rarely get to make or buy anything girly. This is my first card I've made without looking anywhere for inspiration beyond my supplies and I'm very pleased with the outcome. I've been going back and forth on if the Simon Says Stamp monthly card kit is worth the price and considering I used most of the materials from this card between last month and this months kit I'll say yes and keep my kits coming for a few more months.

Materials:

Materials:
- Silhouette Cameo to cut Birthday (My First Crush Hollow) and 5 (Wish I Were Taller)
- Simon Says Stamp stamp set in Love This
- Hero Arts Gems in Diamond Gemstones 5mm
- Little B washi tape in Silver Stripe Thin
- Paper from Fancy Pants Beloved collection
- Bazzil Cotton Candy cardstock for base
Adhesives:
- Tombo Mono Multi Liquid Glue for "birthday"
- Glossy Accents for gemstones
- Pop dots for "5"
Saturday, November 30, 2013
December Daily Haul
It seems like everywhere you turn there are sales galore this weekend post Thanksgiving. I did jump on the Silhouette sale - 40% off plus free shipping over $25! I ordered 2 new blades to keep on hand, transfer tape, and a roll of white vinyl. I wish I could say I picked up more exciting things but I have so much Silhouette stuff I haven't gotten a chance to play with yet already. By the time I get to play it will be Thanksgiving 2014 and hopefully they will have the sale again.


My local scrapbook store had a great sale this weekend too, I didn't even stop in for Christmas stuff but I needed to pick up a roll of washi tape to finish a card and walked out with a bunch of stuff. In my defense this will be perfect for my December daily that starts tomorrow. I think most people do this in a mini album but I'm going to put it right in my project life 2013-2014 album because I don't do weekly, I do by event. I haven't decided if I'm going to put it throughout or do all the events then DD. Since it starts tomorrow I really should figure that out... But on to my haul!

My LSS had a Bo Bunny "kit" sale for $6 per kit. In the kit I picked up was 10 sheets of double sided cardstock as shown below (2 per design), button set, jewel set, and a sheet of cardstock stickers. I also picked up the red chevron washi tape not on sale, and the Hero Arts Circle Ornament Tree stamp at 50% off. The green glitter thickers were a Hobby Lobby purchase a bit ago.

I also did a few hauls on jessicasprague.com during One Buck Wendnesday over the past month or so. I use the kits in the Silhouette software using the Print and Cut feature so some of this will be in my DD as well. I wish they were still offering OBW but it's been on hold until the new year at this point. Bummer! The kits I picked up were the Carta Bella Merry and Bright, Echo Park's A Very Merry Christmas, and Echo Park Holly Jolly.
Anyone else doing December Daily? Tell me how you are doing it!
Friday, November 29, 2013
Birthday Banners
Over the past few months I've done a few banners for friends I wanted to share and am currently working on a "one-derland" themed banner which I will show once it's finished.
 |
| Tea Party Banner - The most fun to make because it was so girly |
 |
| One of my very first banners 2 years ago, an Octoberfest themed party |
 |
| Blackhawks birthday banner. I used print and cut for the Blackhawks logo |
 |
| Batman Theme - Also did a Superman but don't have a photo |
Thankful For...
I'm a day late on this post but Happy Thanksgiving! I was so busy yesterday I didn't even stop to reflect on what I was thankful for. Of course I'm thankful every day but there is a certain something about the whole day of giving thanks that makes you appreciate it so much more.
Of course my top of the list thankful for would be my son. Every day he amazes me and sometimes I just can't believe I actually MADE him, it blows my mind. I can remember his first Thanksgiving well, it wasn't easy to have a crowded room of people and a baby who just wanted to crawl and had no interest in food. And those were the "easy" days, I just didn't realize it yet! :)

I'm also thankful for my husband, I've been under the weather and if he's home and I'm not feeling well I don't even have to ask, I can stay in bed all day and he'll take care of Landon. He's not perfect, and I'm not perfect, but on Sunday we'll celebrate 4 years of marriage.
And lastly I'm thankful for the rest of my family and friends. Lots of good health and fortune this year and I'm hoping 2014 continues that way!
Of course my top of the list thankful for would be my son. Every day he amazes me and sometimes I just can't believe I actually MADE him, it blows my mind. I can remember his first Thanksgiving well, it wasn't easy to have a crowded room of people and a baby who just wanted to crawl and had no interest in food. And those were the "easy" days, I just didn't realize it yet! :)

I'm also thankful for my husband, I've been under the weather and if he's home and I'm not feeling well I don't even have to ask, I can stay in bed all day and he'll take care of Landon. He's not perfect, and I'm not perfect, but on Sunday we'll celebrate 4 years of marriage.
And lastly I'm thankful for the rest of my family and friends. Lots of good health and fortune this year and I'm hoping 2014 continues that way!
Wednesday, November 27, 2013
Buzz Lightyear Felt Wings
For Halloween this year my toddler wanted to be Buzz Lightyear which was an easy enough costume to find but none of the options came with wings! What is the point of BL without wings? Amazon sold some for $8 plus I have prime so no shipping but I thought it was the perfect opportunity to try and make some. I don't have a step by step photo breakdown but I did my best to explain how I did this!

Materials:

Materials:
- Felt in purple, lime green, white, gray and red
- Thin cardboard (I used a cereal box)
- Ribbon or elastic
- Hot glue gun and glue sticks
Instructions:
- I sketched and cut the basic shape out of a cereal box. I mostly eyeballed sizing this with the exception of the sizing from the middle to the edges so the "jet pack" wouldn't look lopsided in the middle. For the lines I did use a ruler to sketch to make sure it was straight when I cut.
- I completely covered the back of the cereal box with white felt and hot glue, trimming off the excess around the shape.
- For the details on the pack I took my sons doll and copied it. Everything was pretty simple to eyeball and I'm not good at things like this, just take your time on this part. I did not glue anything down until all the pieces were cut out and arranged how I liked them. For the green side pieces I did take a separate piece of cardboard that I cut into oval shapes and covered to make them pop more. Hot glue everything down.
- I used ribbon to tie on my son's shoulders but you can use elastic as well. On the side that touched my son's back I hot glued a piece of ribbon on each side of the jet pack in the places I felt it would sit on his shoulders and be tied on. Over that I glued purple felt and cut around the excess. That's it! You're done!
Things I would do differently: I would get thicker ribbon as I felt the smaller ribbon didn't hold as well and slipped more than I would have liked.
The most time consuming part of this is cutting out all the details of the wings but it is worth it and really I only spent 1.5 hours total on this project over the course of 2 nights. My total cost ended up being about $3. I only had to buy felt and I bought a lot more than I needed. And the best part was my son's face when he saw the wings and found out I made them, he loved them!
Craft Night - Vinyl Wine Glasses
I'm actually not a big drinker anymore but I love having decorated wine glasses in my house because they are too cute. Back in October we had friends over to watch the Red Sox game and for us girls to mess around with the Silhouette. Originally our plan was etched wine glasses but I cannot find my etching cream so plan B was two tone vinyl decals with our names and initials. The result was awesome and I think I sold my friends boyfriend on getting her a cameo for Christmas too!
A few tips:
 |
| Excuse the cell phone photo, I did not have my digital camera handy |
A few tips:
- Pick a thicker font, thin fonts will not cut well out of vinyl and they look much better with the two tone look
- There are many different types of vinyl, if you're putting this on a wine glass that you put through the dishwasher make sure you pick an outdoor grade vinyl
- For small transfers like this I've been known to use painters tape instead of the transfer tape to apply to the glass but painters tape can go "bad" and be too sticky so test on a small piece first
- Wash and dry the glasses completely before applying the vinyl, it will last a long time this way
Subscribe to:
Posts (Atom)