Pages

Showing posts with label craft. Show all posts

Thursday, June 12, 2014

Card Making Galore!

I was lucky enough to take a Lawn Fawn specific card making class with Jenn from Shurkus.com on Saturday at a local scrapbook store and afterward I was incredibly inspired! I learned some new techniques that I am psyched to try out soon, mostly copics. I finally got to play around with them and I'm in love! They are so easy to use but boy oh boy they are expensive. That is going to be an investment that I'm going to have to talk my husband into letting me purchase. For now I will settle for my prisma colored pencils and gamesol.

So after class I did a wee bit of shopping from some old and new Lawn Fawn products. The older things I picked up were the Let's Polka 6x6 paper pad, Stitched Journaling Card die set, and Speech Bubble Border die. From the new release I picked up the Beep Boop Birthday stamp set and matching lawn cuts. I am pretty sure I'm going back to get Chit Chat stamp set and matching lawn cuts, I was eyeing it and totally regret not purchasing it! And of course onto the cards I put together using my new goodies...

 Supplies:


Supplies:
I also used some non new goodies to work up one out of 3 Father's Day cards I needed to make. I'm terrible at masculine cards! They are always so difficult since I am in love with all things pinky and girly but I think I did alright for my first try. It's always fun to break out old products and use them in new ways. This was also my first time embossing an image on watercolor paper and then using distress inks on top to do a watercolor resist effect, this is probably my favorite technique so far and I really love the look of it, perfect for a manly card using darker colors!


Supplies:

Saturday, June 7, 2014

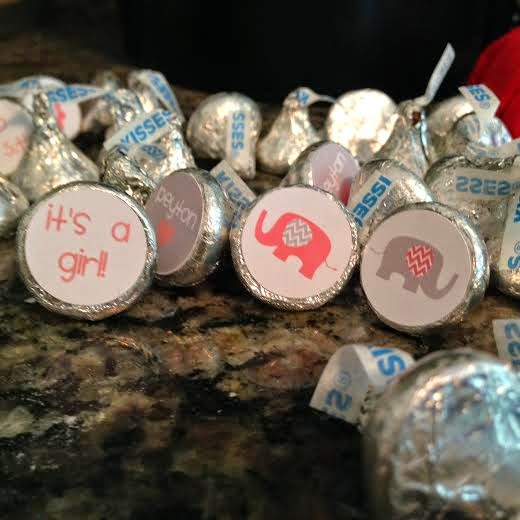
Hershey Kiss Stickers

While planning a baby shower I thought it would be cute to do the Hershey Kiss stickers you see all over pinterest/etsy as part of the table decorations. You will need to create 3/4" diameter stickers for these. I believe Avery makes labels in a size that will work but I used my Silhouette Cameo and regular sticker paper to do this project. It was super simple to create images in the Silhouette program using the same graphics I used on the rest of the baby shower projects I did. I got 40 stickers per sheet. I might have been able to get more done but my printer is extremely fussy and if I take up too much of the print and cut area it will completely cut off my project during printing! I was too afraid of wasting ink and sticker paper to see just how many I could get out of there.


I am going to try and do a video tutorial soon on these since they were so cute and such a hit I'm going to make them for Landon's 5th birthday. Yes, I am THAT mother that is already planning her child's birthday when he still has 7 months until then...

Saturday, December 28, 2013

Winter Wonderland/Onederland Birthday Party

I was asked to make a banner plus a few extras for a little girls first birthday! Since everyone I know pretty much has boys I was psyched to get to do something girly. The request was winter wonderland/onederland themed and mostly blue/white with a touch of pink and glitter.

Food tags! 4"x2" when folded and left blank for her to write anything she wants on them. I also included a few extras she can use for other things or in case she messes up on a tag.

Favor tags! 2.5" diameter, I left enough ribbon for her to tie on or she can tape it on and the hanging ribbon will still look cute.


The banner! This banner was probably the most work yet only because I didn't like the way the original colors were. I started just white, light blue, and pink but it looked like a baby shower. I added in the dark blue and dark pink but I thought it was too much pink. Finally I settled on dark blue, light blue, white, and a few sprinklings of pink. The snowflakes were cut out of Doodlebug's lily white sugar coated cardstock and is very sparkly, the penguin was a silhouette cut file from their store. Each square is 4.25"x4.25" so it's pretty large!


Friday, December 27, 2013

January 2014 Simon Says Stamp Card Kit - Valentines Days Card


Materials:

  • Silhouette Cameo to cut shapes (flag shape designed by me, sentiment shape from silhouette store)
  • Simon Says Stamp stamp set in Only Have Eyes For You
  • Mini Heart Brads (source unknown)
  • Cuttlebug Embossing Folder in Birds and Swirls
  • Paper from Fancy Pants Beloved collection
  • Bazzil Cotton Candy cardstock for base, Bazzil Marshmallow cardstock for sentiment shape and background
Adhesives:
  • Tombo Perm Adhesive Tape Runner
  • Pop dots for sentiment

Friday, November 29, 2013

Birthday Banners

Over the past few months I've done a few banners for friends I wanted to share and am currently working on a "one-derland" themed banner which I will show once it's finished.

Tea Party Banner - The most fun to make because it was so girly

One of my very first banners 2 years ago, an Octoberfest themed party

Blackhawks birthday banner. I used print and cut for the Blackhawks logo

Batman Theme - Also did a Superman but don't have a photo


Wednesday, November 27, 2013

Buzz Lightyear Felt Wings

For Halloween this year my toddler wanted to be Buzz Lightyear which was an easy enough costume to find but none of the options came with wings! What is the point of BL without wings? Amazon sold some for $8 plus I have prime so no shipping but I thought it was the perfect opportunity to try and make some. I don't have a step by step photo breakdown but I did my best to explain how I did this!


Materials:

  • Felt in purple, lime green, white, gray and red
  • Thin cardboard (I used a cereal box)
  • Ribbon or elastic
  • Hot glue gun and glue sticks
Instructions:
  1. I sketched and cut the basic shape out of a cereal box. I mostly eyeballed sizing this with the exception of the sizing from the middle to the edges so the "jet pack" wouldn't look lopsided in the middle. For the lines I did use a ruler to sketch to make sure it was straight when I cut.
  2. I completely covered the back of the cereal box with white felt and hot glue, trimming off the excess around the shape. 
  3. For the details on the pack I took my sons doll and copied it. Everything was pretty simple to eyeball and I'm not good at things like this, just take your time on this part. I did not glue anything down until all the pieces were cut out and arranged how I liked them. For the green side pieces I did take a separate piece of cardboard that I cut into oval shapes and covered to make them pop more. Hot glue everything down.
  4. I used ribbon to tie on my son's shoulders but you can use elastic as well. On the side that touched my son's back I hot glued a piece of ribbon on each side of the jet pack in the places I felt it would sit on his shoulders and be tied on. Over that I glued purple felt and cut around the excess. That's it! You're done! 
Things I would do differently: I would get thicker ribbon as I felt the smaller ribbon didn't hold as well and slipped more than I would have liked. 

The most time consuming part of this is cutting out all the details of the wings but it is worth it and really I only spent 1.5 hours total on this project over the course of 2 nights. My total cost ended up being about $3. I only had to buy felt and I bought a lot more than I needed. And the best part was my son's face when he saw the wings and found out I made them, he loved them! 

Craft Night - Vinyl Wine Glasses

I'm actually not a big drinker anymore but I love having decorated wine glasses in my house because they are too cute. Back in October we had friends over to watch the Red Sox game and for us girls to mess around with the Silhouette. Originally our plan was etched wine glasses but I cannot find my etching cream so plan B was two tone vinyl decals with our names and initials. The result was awesome and I think I sold my friends boyfriend on getting her a cameo for Christmas too!

Excuse the cell phone photo, I did not have my digital camera handy


A few tips:

  • Pick a thicker font, thin fonts will not cut well out of vinyl and they look much better with the two tone look
  • There are many different types of vinyl, if you're putting this on a wine glass that you put through the dishwasher make sure you pick an outdoor grade vinyl
  • For small transfers like this I've been known to use painters tape instead of the transfer tape to apply to the glass but painters tape can go "bad" and be too sticky so test on a small piece first
  • Wash and dry the glasses completely before applying the vinyl, it will last a long time this way